Computer Vision In Web | Intro To OpenCV JS
Dive into Computer Vision with OpenCV JS. Unleash the Power of Visual Recognition and Real-Time Image Processing for Web Applications


In this article, we'll be covering how to create computer vision projects that you can deploy to the web (which you directly share with others and add to your resume ✨)
Project Demo
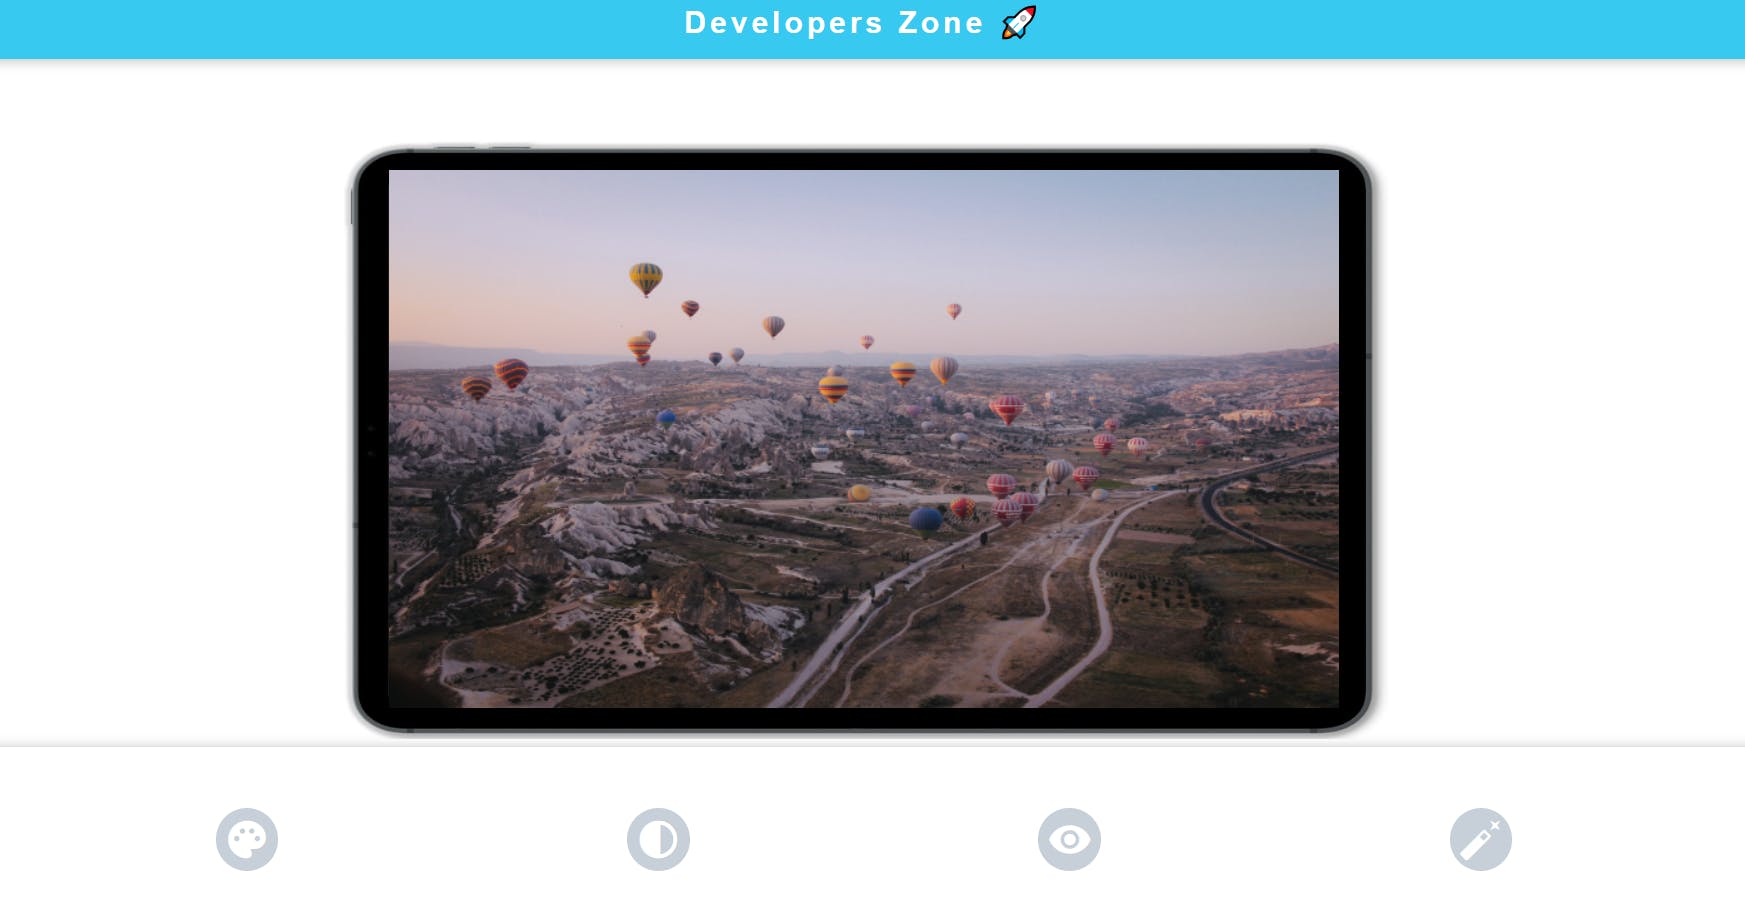
Take a look at the deployed project right here.
Prerequisites
HTML, CSS, JS (familiarity)
Good to have prior knowledge of OpenCV (although not required)
OpenCV Js
Starting Our Project
Let's start with building our project.
Initialize Project Folder
Create your project folder. Open it in an editor of your choice and create this basic folder structure

a. Resources: It contains the image assets that we will use in this project as well as the opencv.js file which is the script file needed for loading the opencvjs package in our project.
b. Template: It contains our js code and the CSS file.
c. index.html: lastly our website page
You can find the GitHub Repo right here to download all the necessary files.
Creating The UI
In the project demo at the top of the page, we saw the UI of our site. We'll have a header at the top, our main page where we will show our tablet image as well as the image we render after applying the transformations (on canvas).
1. index.html
<!DOCTYPE html>
<html lang="en">
<head>
    <meta charset="UTF-8">
    <meta http-equiv="X-UA-Compatible" content="IE=edge">
    <meta name="viewport" content="width=device-width, initial-scale=1.0">
    <title>VisionGraphics</title>

    <!-- Link to css -->
    <link rel="stylesheet" href="./Template/style.css">
    <!-- Material Icons Google -->
    <link href="https://fonts.googleapis.com/icon?family=Material+Icons"
    rel="stylesheet">
    <!-- Add opencv -->
    <script async src="./Resources/opencv.js" onload="openCvReady()" ></script>
</head>
<body>
    <div class="main-page">

        <!-- Right panel -->
        <div class="right-panel">
            <!-- Header -->
            <div class="header">
                <!-- <div class="empty-side"></div> -->
                <h1>Developers Zone 🚀</h1>
                <!-- <div class="logo-container">
                    <img src="/Resources/Template/Logo.png" alt="logo" width="120">
                </div> -->
            </div>


            <!-- Tablet Container -->
            <div class="tablet-container">
                <img id="table-image" src="./Resources/Template/tablet.png"
                     alt="tablet frame"
                     width="840"
                     height="480">
                <canvas id="main-canvas">
                    <img
                    id="img-main"
                    src="./Resources/Template/scene.jpg"
                    alt="car image"
                    width="760"
                    height="430">
                </canvas>
                <div id="file-upload" class="file-upload" >
                    <span class="material-icons">
                        add_photo_alternate
                    </span>
                    <label for="input-file">Upload Image</label>
                    <input type="file" name="input-file" id="input-file" accept="image/jpg, image/jpeg , image/png">
                </div>
            </div>
        </div>
    </div>
        <!-- Slide bar -->
        <div class="slide-bar">
            <span id="btn-rgb"
                class="circle">
                <i class="material-icons"
                style="font-size: 36px;color: white;">palette</i>
            </span>
            <span id="btn-gray"
                class="circle">
                <i class="material-icons"
                style="font-size: 36px;color: white;">contrast</i>
            </span>
            <span id="btn-blur"
                class="circle"><i class="material-icons"
                style="font-size: 36px;color: white;">visibility</i>
            </span>
            <span id="btn-canny"
                class="circle"><i class="material-icons"
                style="font-size: 36px;color: white;">auto_fix_normal</i>
            </span>
            <!-- <span id="btn-" class="circle blue" onclick="uploadToggle()" ><i class="material-icons " style="font-size: 36px;color: white;">upload</i> -->
            </span>

        </div>

    <!-- Link JS -->
    <script src="./Template/main.js"></script>
</body>
</html>
styles.css
Now that we have a basic HTML structure of our site ready, we'll apply styling to it now.
* {
    margin: 0px;
    box-sizing: border-box;
}

:root{
    --bg : white;
    --bg-slide-bar: rgba(0,0,0,0.05);
    --bg-right-panel: white;

    --bg-circle-icon: #c7d0d8;
    --box-shadow: 1px 1px 10px rgb(185, 185, 185);
}

body{
    height: 100vh;
    overflow: hidden;
}

.main-page {
    /* background-color: red; */
    height: 100vh;
    display: flex;
}

.slide-bar {
    position: absolute;
    bottom: 0;
    background-color: var(--bg-side-bar);
    width: 100%;
    max-height: 15%;
    display: flex;
    justify-content: space-between;
    padding: 5% 15%;
    align-items: center;
    box-shadow: 1px 1px 10px rgb(185, 185, 185);
}
.circle{
    height: 50px;
    width: 50px;
    background-color: var(--bg-circle-icon);
    border-radius: 50%;
    display: flex;
    justify-content: center;
    align-items: center;
    transition: 256ms;
}
.circle:hover, .circle:active{
    cursor: pointer;
    background-color: var(--bg-side-line);
}

.circle.blue{
    background-color: var(--bg-side-line);
}

.right-panel{
    background-color: var(--bg-right-panel);
    height: 100%;
    width: 100%;
    display: flex;
    flex-direction: column;
}

/* header */
.header{
    background-color: var(--bg-side-line);
    display : flex;
    /* justify-content: space-between; */
    justify-content: center;
    align-items: center;
    padding: 1% 5%;
    box-shadow: var(--box-shadow);
    color: white;
}

.logo-container {
        display: flex;
        justify-content: center;
        align-items: center;
}

.header h1 {
    font-family: "Cairo", sans-serif;
    font-size: 1.5rem;
    letter-spacing: 0.2rem;
}


.tablet-container{
    display: flex;
    justify-content: center;
    align-items: center;
    width: 100%;
    height: 80%;
}
.tablet-container #table-image{
    position: absolute;

}
.tablet-container canvas ,.tablet-container canvas img{
    z-index: 4;
}
.file-upload{
    z-index: 5;
    position: absolute;
    min-width: 700px;
    min-height: 500px;
    flex-direction: column;
    justify-content: center;
    align-items: center;
    border : 5px dashed #37c9ef;
    display: none;
}

.showupload{
    display: flex;
}

.file-upload span {
    font-size: 5rem;
}
.tablet-container label , .tablet-container input{
    z-index: 3;
}
.tablet-container input{
    display: none;
}
.tablet-container label{
    box-shadow: var(--box-shadow);
    padding: 1% 2%;
    background-color: orangered;
    color: white;
    font-size: 2rem;
    margin: 5% 0;
    font-weight: 600;
}
So, that's it for the UI part of our website. Now it's time to integrate the logic to apply the image transformations.
Handling the Computer Vision
main.js
If you notice in the index.html file we have given a script tag with src as opencv.js file and we have provided openCvReady() as the onload function for this script.
So only after the OpenCV module is loaded do we want to do anything else right? So let's wait for the script to load first!
And note that after the script is loaded you can refer to the OpenCV module by using the cv object.
function openCvReady() {
    cv["onRuntimeInitialized"] = () => {
        console.log("Open Cv ready")
    }
}
The next thing we want is to read our image right? For this, we'll use the imread method provided by OpenCV.
- cv.imread(String img_element_id) :
if you have used OpenCV module before you might notice that you enter the file path as a parameter in the imread method but in this case, you provide the id of the img HTML element and it automatically takes the image file from the src of the element.
Returns an InputArray matrix.
We'll also have to show this image right? So, we'll use another method provided by the OpenCV module called imshow
cv.imshow(String element_id, InputArray mat ):
- This method is used to show image matrix in an html element. We pass in the id of the HTML element and the image matrix (that we get from imread() method) as parameters.
Returns none;
So, let's use these two methods to display our image in the main-canvas.
// Read an image
let imgMain = cv.imread('img-main')
let inputFile = document.getElementById("input-file");
cv.imshow("main-canvas", imgMain);
imgMain.delete();
Now to apply image transformations we'll be using the following methods provided by the OpenCV module:
cv.cvtColor(InputArray input, InputArray output, code, dstCn)
Parameters
input: input array
output: output image array of the same size and depth as the input array
code: color space conversion code (see cv.ColorConversionCodes)
dstCn: number of channels in the destination image; if the parameter is 0, the number of the channels is derived automatically from src and code
cv.GaussianBlur(src, dst, ksize, sigmaX)
Parameters
src − A Mat object representing the source (input image) for this operation.
dst − A Mat object representing the destination (output image) for this operation.
ksize − A Size object representing the size of the kernel.
sigmaX − A variable of the type double representing the Gaussian kernel standard deviation in X direction.
cv.Canny(InputArray image, OutputArray edges, threshold1, threshold2, apertureSize
3,L2gradientfalse)This method is use to find the edges in the image.
So we'll use these methods to make the buttons on our page functional. We'll have to wrap these methods inside onclick event handler like this:
        document.getElementById("btn-gray").onclick = () => {
            // Read an image
            let imgMain = cv.imread('img-main')
            let imgGray = imgMain.clone();

            // converting image to grayscale
            cv.cvtColor(imgMain, imgGray, cv.COLOR_RGBA2GRAY, 0)

            cv.imshow("main-canvas", imgGray);
            imgMain.delete(); // to free memory allocated
            imgGray.delete(); // to free memory allocated
        }
Applying all the methods and merging all the code snippets we get the final main.js as follows:
function openCvReady() {
    cv["onRuntimeInitialized"] = () => {
        console.log("Open Cv ready")
        // Read an image
        let imgMain = cv.imread('img-main')
        let inputFile = document.getElementById("input-file");
        cv.imshow("main-canvas", imgMain);
        imgMain.delete();


        document.getElementById("btn-rgb").onclick = () => {
            // Read an image
            let imgMain = cv.imread('img-main')
            cv.imshow("main-canvas", imgMain);
            imgMain.delete(); // to free memory allocated
        }

        document.getElementById("btn-gray").onclick = () => {
            // Read an image
            let imgMain = cv.imread('img-main')
            let imgGray = imgMain.clone();

            // converting image to grayscale
            cv.cvtColor(imgMain, imgGray, cv.COLOR_RGBA2GRAY, 0)

            cv.imshow("main-canvas", imgGray);
            imgMain.delete(); // to free memory allocated
            imgGray.delete(); // to free memory allocated
        }

        document.getElementById("btn-blur").onclick = () => {
            // Read an image
            let imgMain = cv.imread('img-main')
            let imgBlur = imgMain.clone();

            // adding blur
            let ksize = new cv.Size(49 , 49);
            cv.GaussianBlur(imgMain, imgBlur, ksize, 0)

            cv.imshow("main-canvas", imgBlur);
            imgMain.delete(); // to free memory allocated
            imgBlur.delete(); // to free memory allocated
        }

        document.getElementById("btn-canny").onclick = () => {
            // Read an image
            let imgMain = cv.imread('img-main')
            let imgCanny = imgMain.clone();

            // adding blur
            cv.Canny(imgMain, imgCanny, 50, 100)

            cv.imshow("main-canvas", imgCanny);
            imgMain.delete(); // to free memory allocated
            imgCanny.delete(); // to free memory allocated
        }
    }
}
Thats It! You are now successfully able to use the OpenCv module inside your web applications.
What next?
Try out new stuff like handling video objects and using models to detect objects on real cam stream etc.
Keep Learning & Keep Building
See you guys 👋