DoIT - A ToDo React App with Appwrite
In this blog post, we'll cover the basics of how to use Appwrite as a backend. We'll create a to-do application in ReactJs to get hands-on experience.

Full Stack Developer 💻|| Content Creator 📽️ || Techincal writer ✒️ I am passionate about learning new things and creating new stuff. And I also love to share what I learn as well as connect with new people, so let's connect ✨
Team Details
Since this was an individual project, I am only mentioning my name and username.
- Yagyesh Bobde- Hashnode username: @Byagyesh
I have also created a full video tutorial for this video on youtube.
Description of Project
A simple todo application with the following functionalities:
Create, edit, and delete todo items
Mark todo items as completed
Authentication
What is Appwrite?
Appwrite is a backend platform for developing Web, Mobile, and Flutter applications. Built with the open source community and optimized for a developer experience in the coding languages you love.
Website: https://appwrite.io
Tech Stack
The technologies involved in creating this project include:
ReactJs (fronend)
Tailwind (css)
Appwrite (backend)
Authentication
Database
Vercel (deployment)
Initializing Project
npm create-react-app todo-project
Install the required packages
npm i appwrite react-router-dom uuid
// initialize tailwind css
npm install -D tailwindcss
npx tailwindcss init
In the tailwind.config.js update the content property to content: ["./src/**/*.{html,js}"]
Also, add tailwind directives to the src/index.css file
@tailwind base;
@tailwind components;
@tailwind utilities;
Creating The Required Folder Structure
So, in this step, we'll create all the required files and components for our site.
- In the src folder create a components directory, and create the following files:
Login.jsx
Signup.jsx
Profile.jsx
TodoForm.jsx
Todos.jsx
- Next, create a directory named
appwriteinside the src and inside it createappwriteConfig.js.
This is how the project folder structure looks like after creating the above mentioned files.
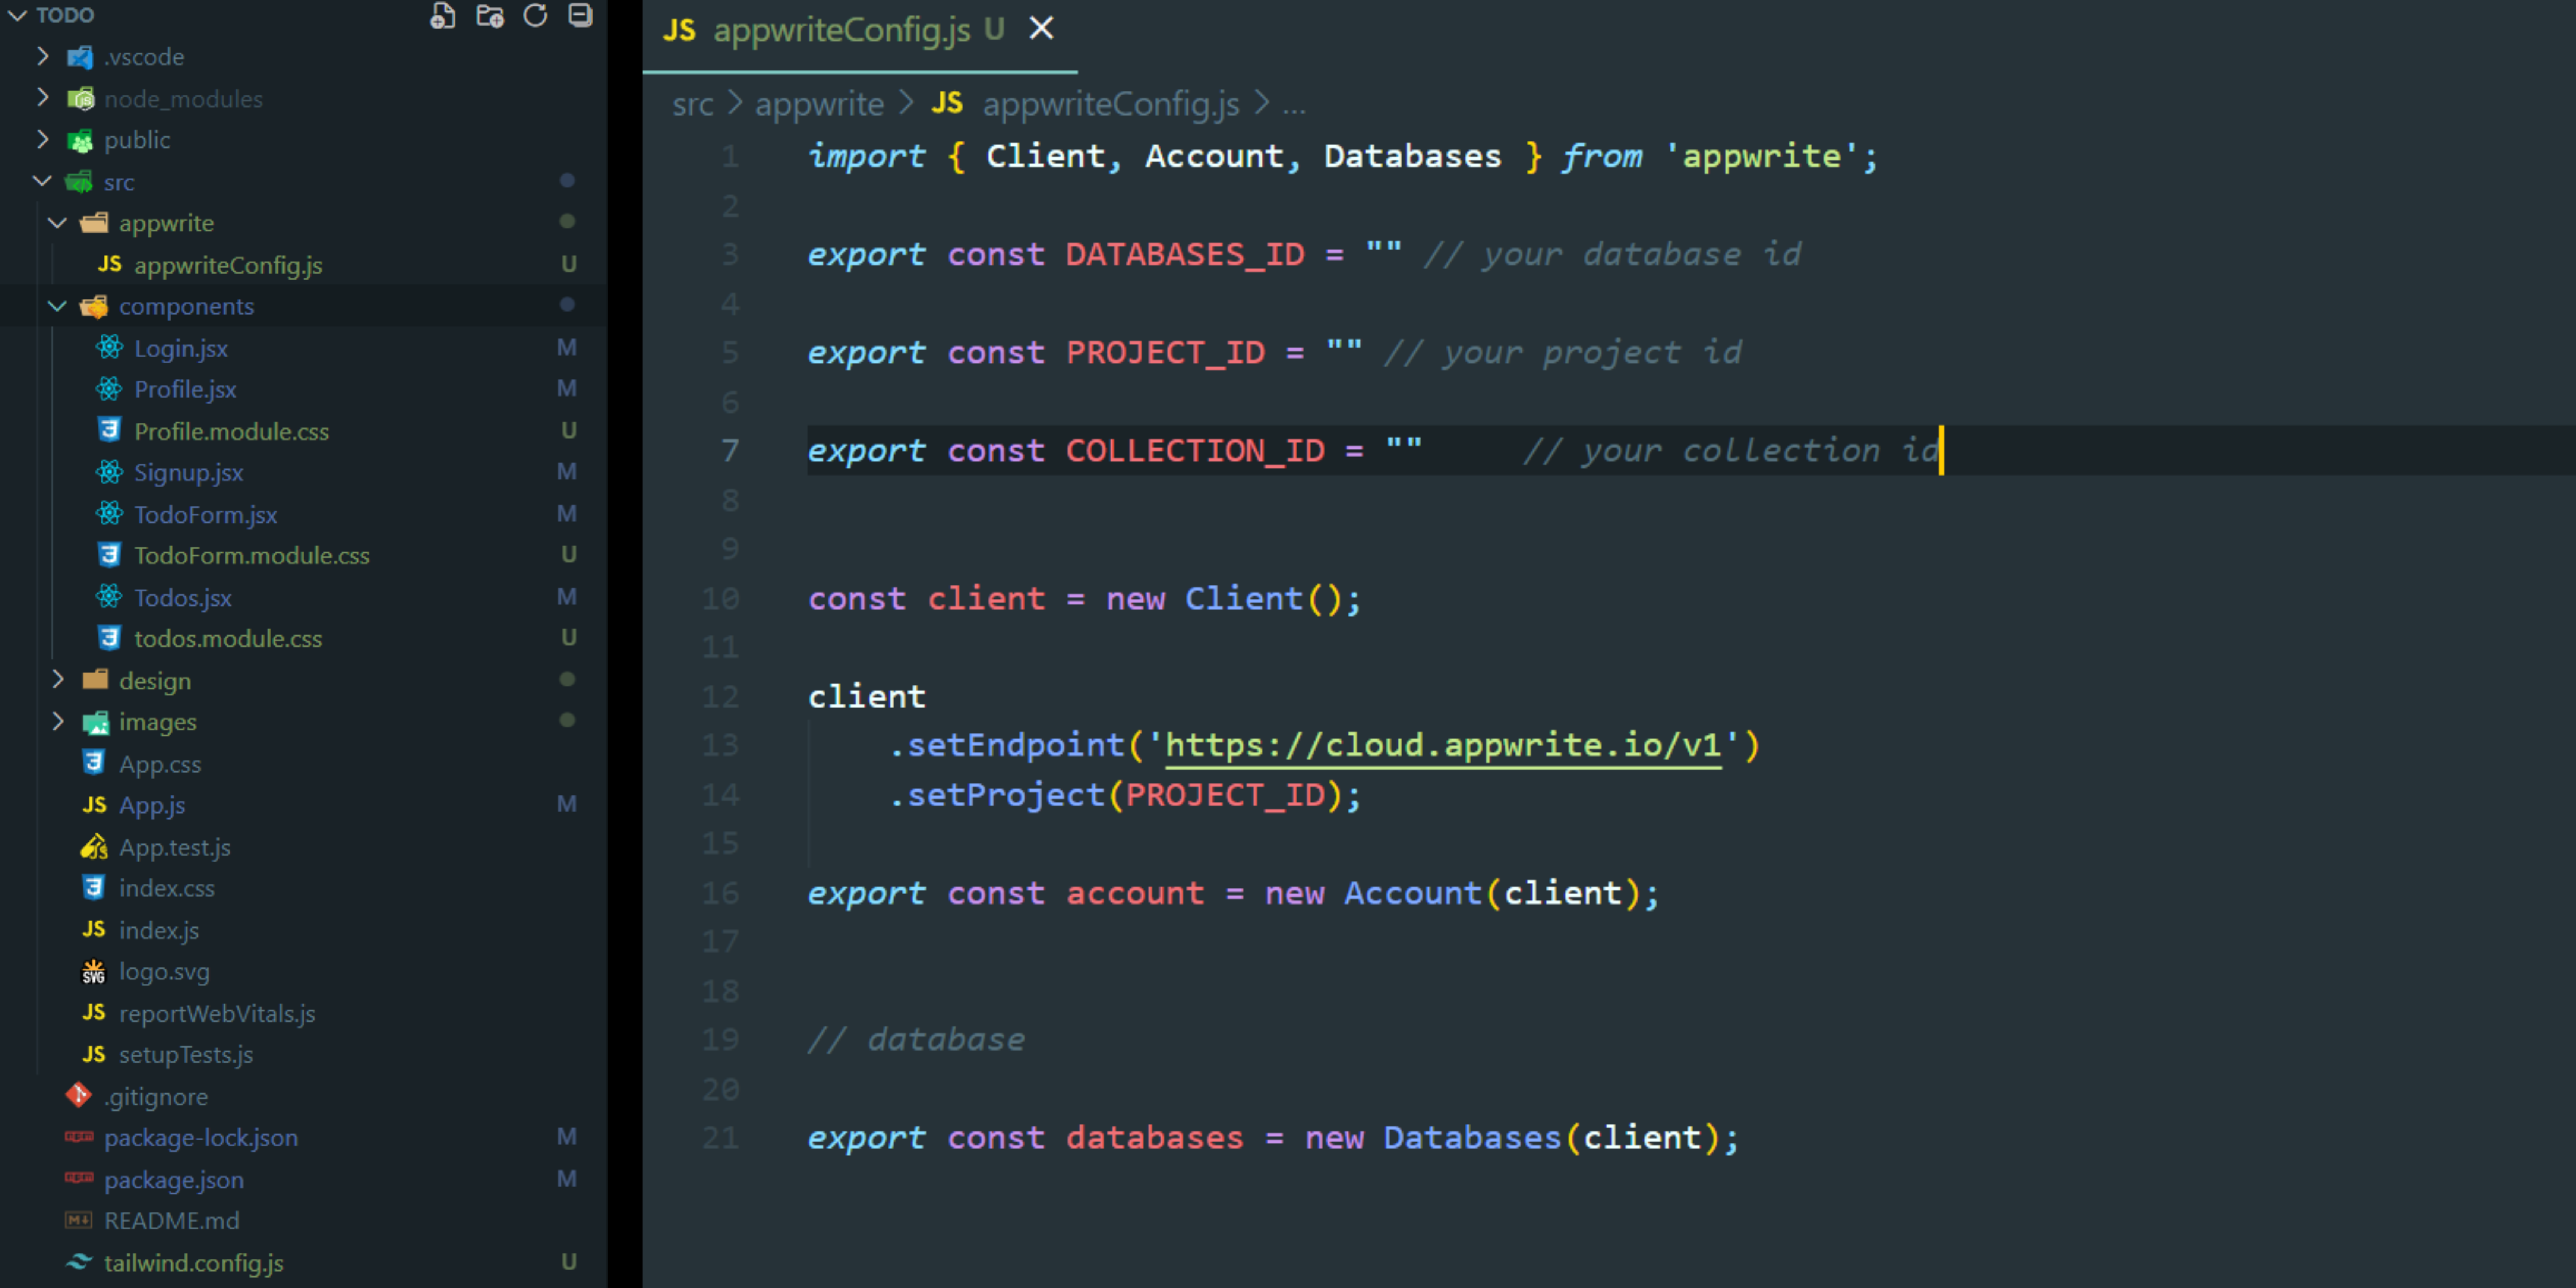
We'll discuss the appwriteConfig.js code in the later part of this article.
Appwrite Console
Before we go into the React part of our project, we'll first create a database to store our todos and register users with Appwrite.
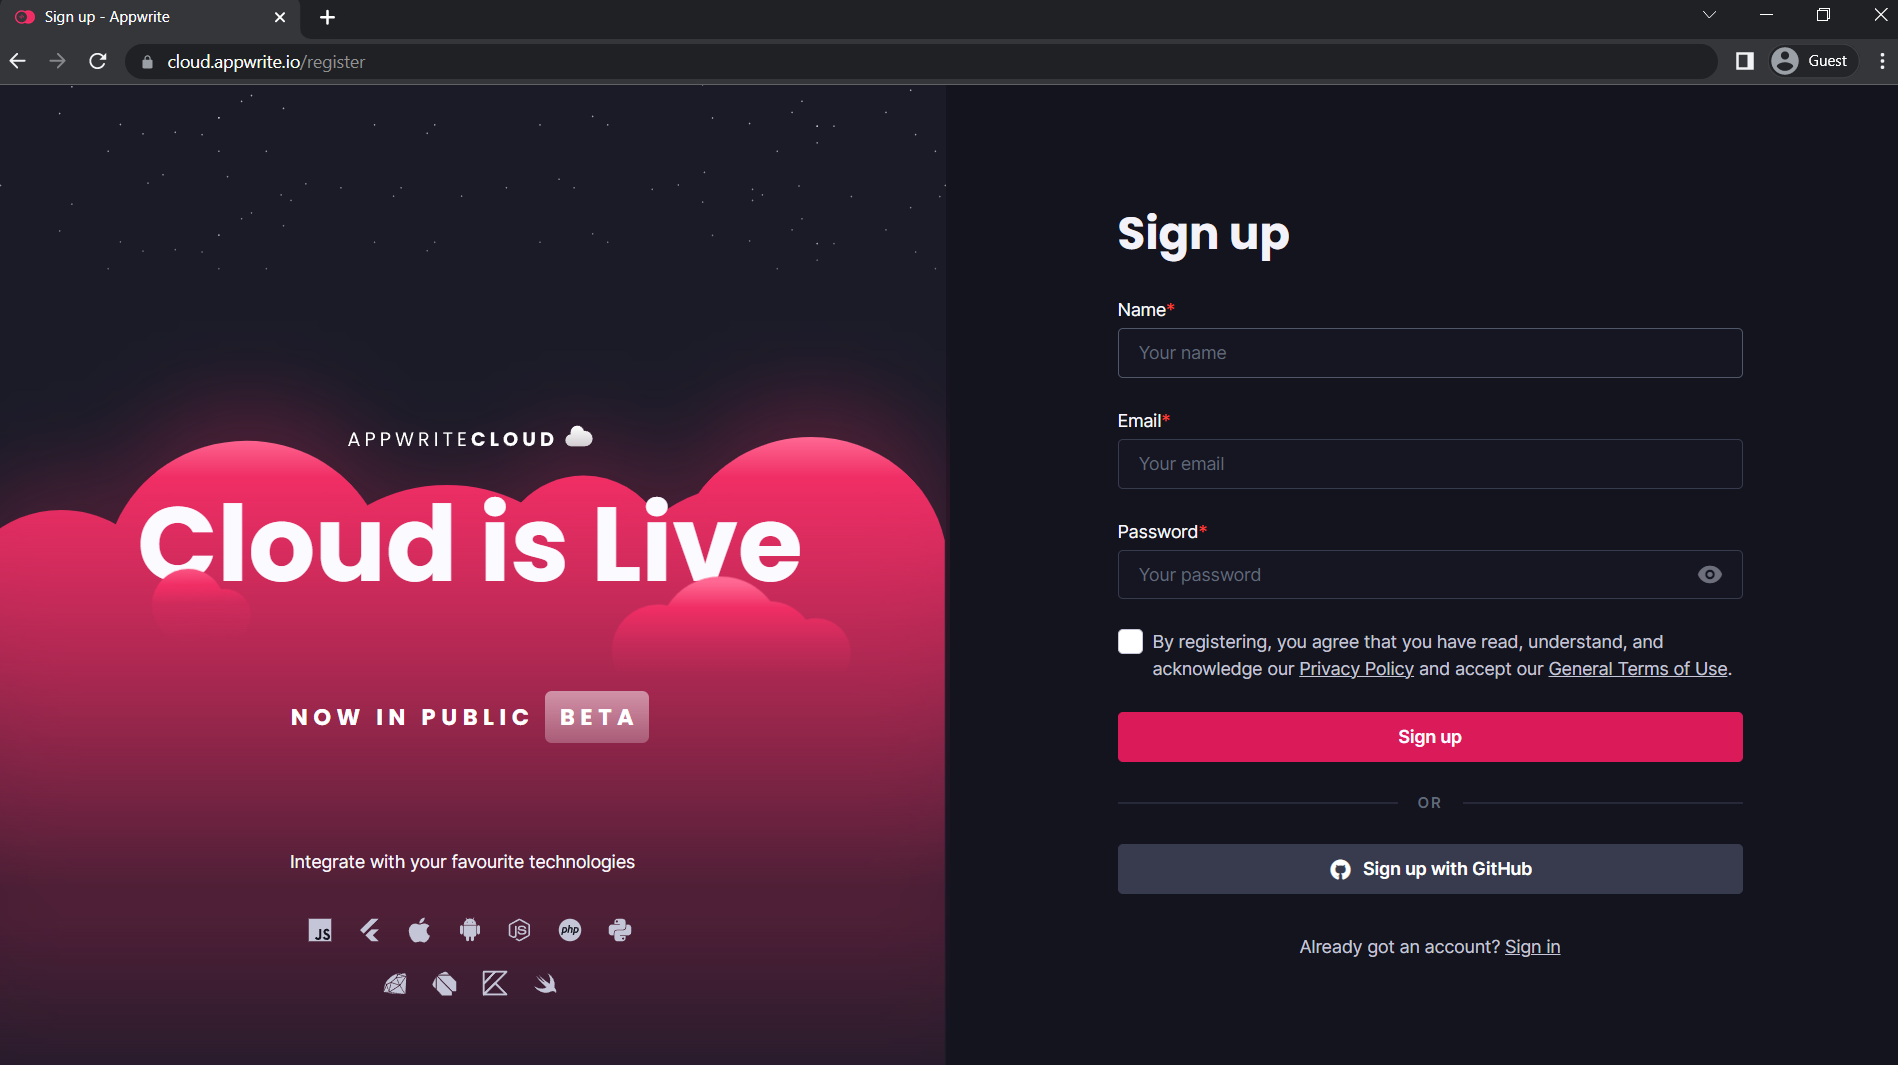
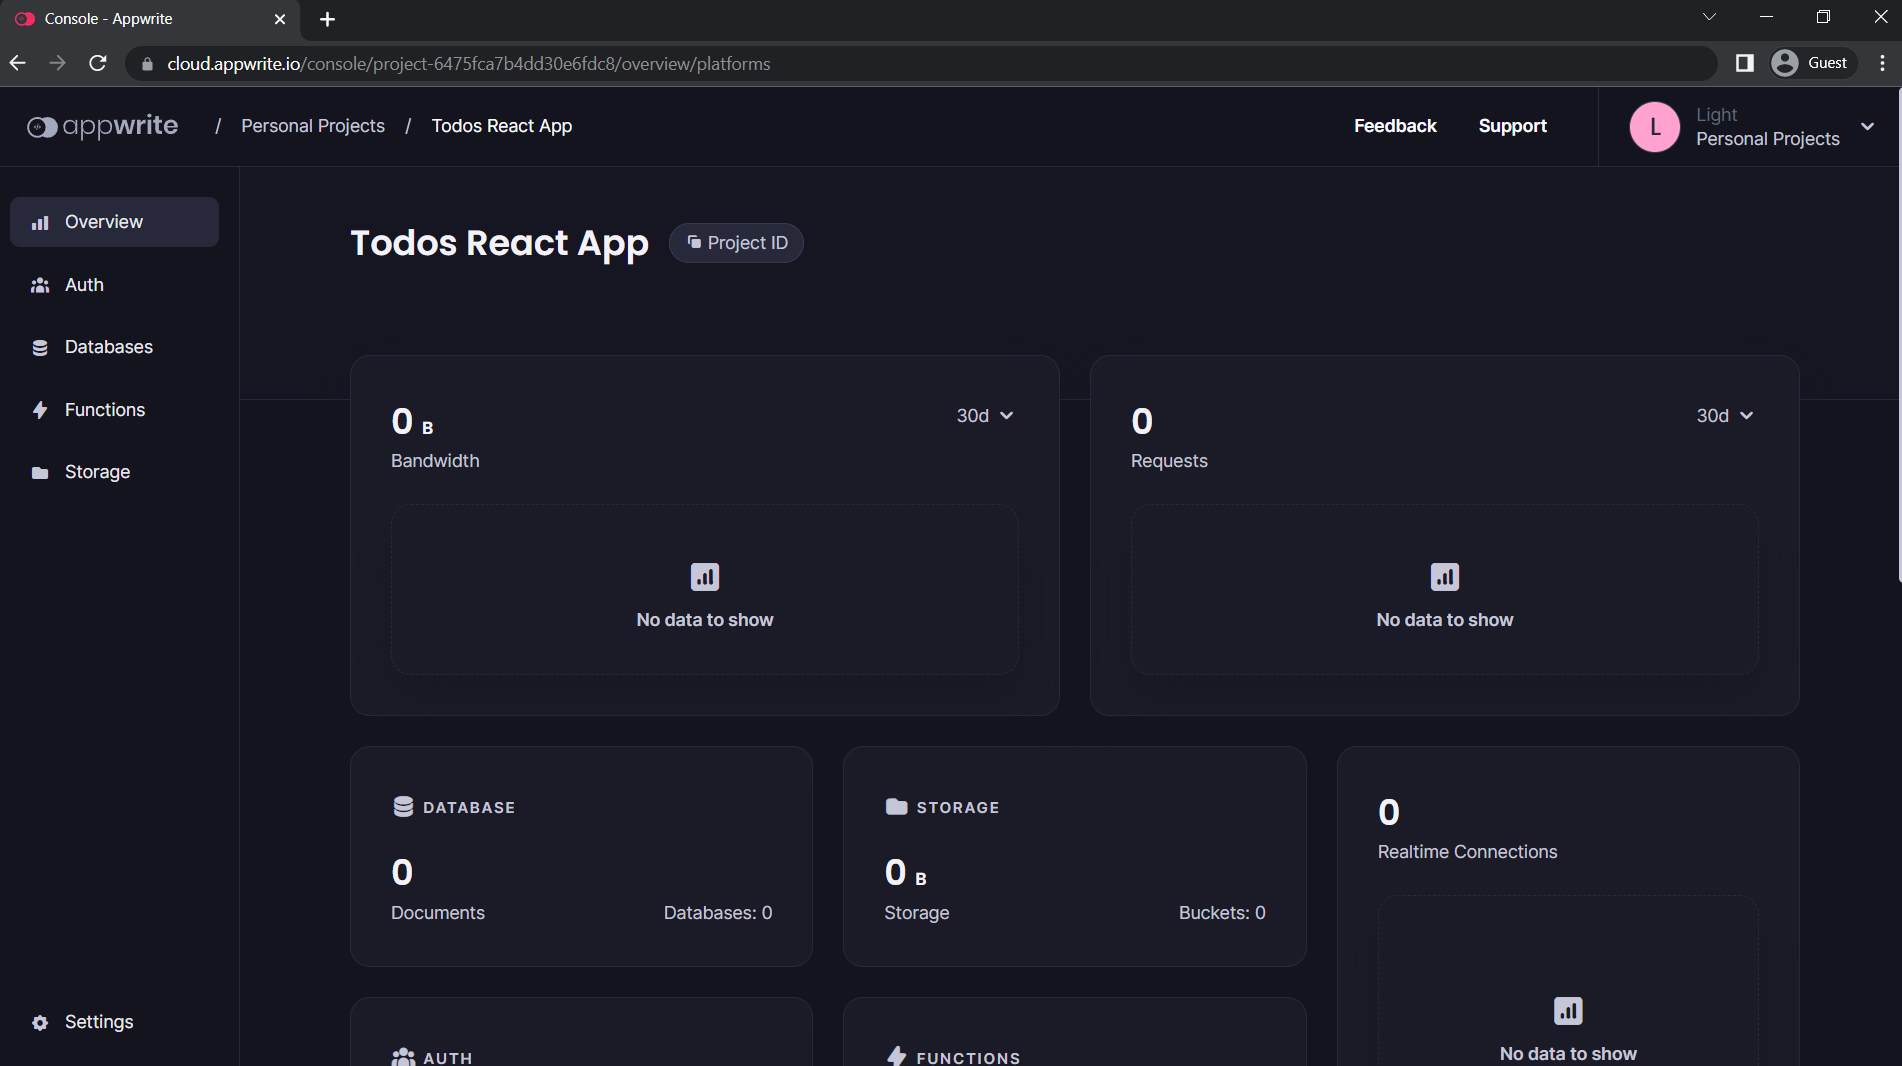
- So, go to cloud.appwrite.io/console and if you don't have an account, sign up first. After creating your account, sign in and you should see this screen,
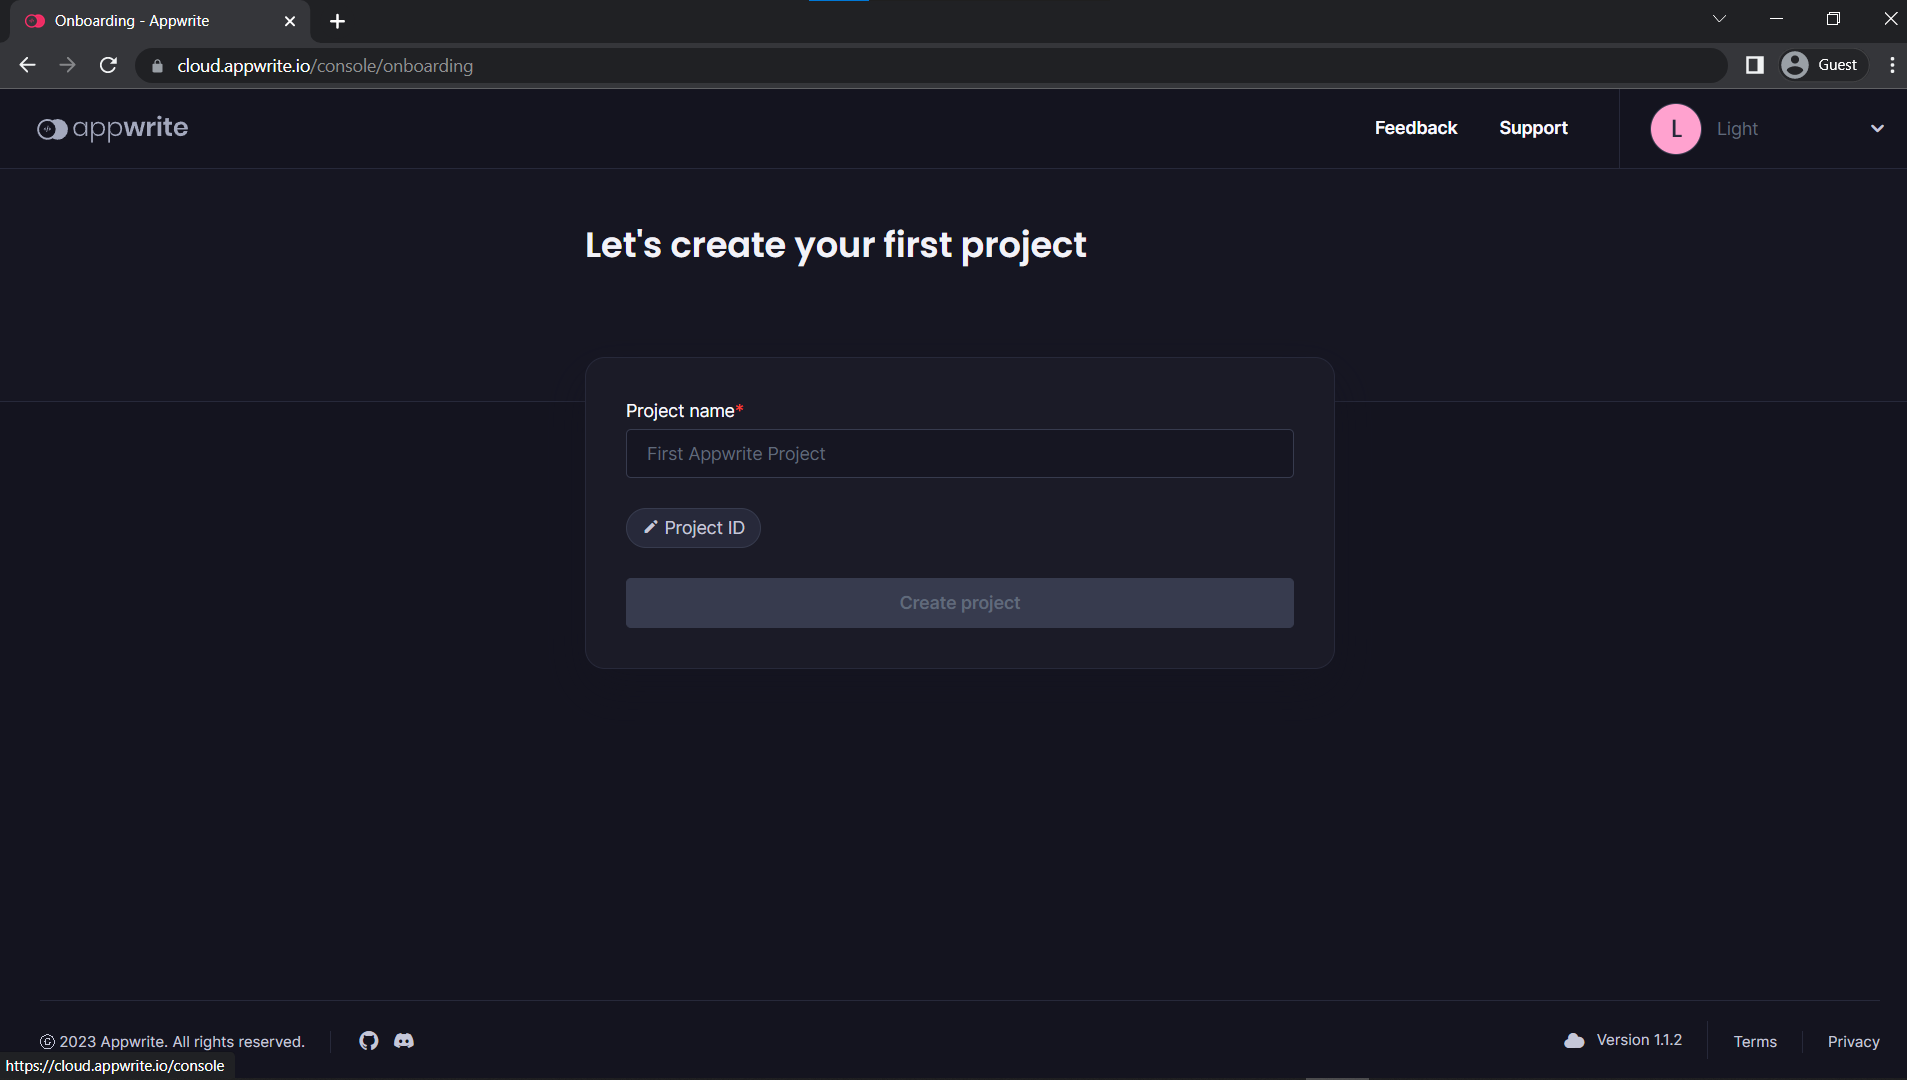
It prompts you to create your first project, so enter a project name of your choice and press Create project.
Next, you will see a lot of options for integration, in our case we'll click on the web app as our platform.
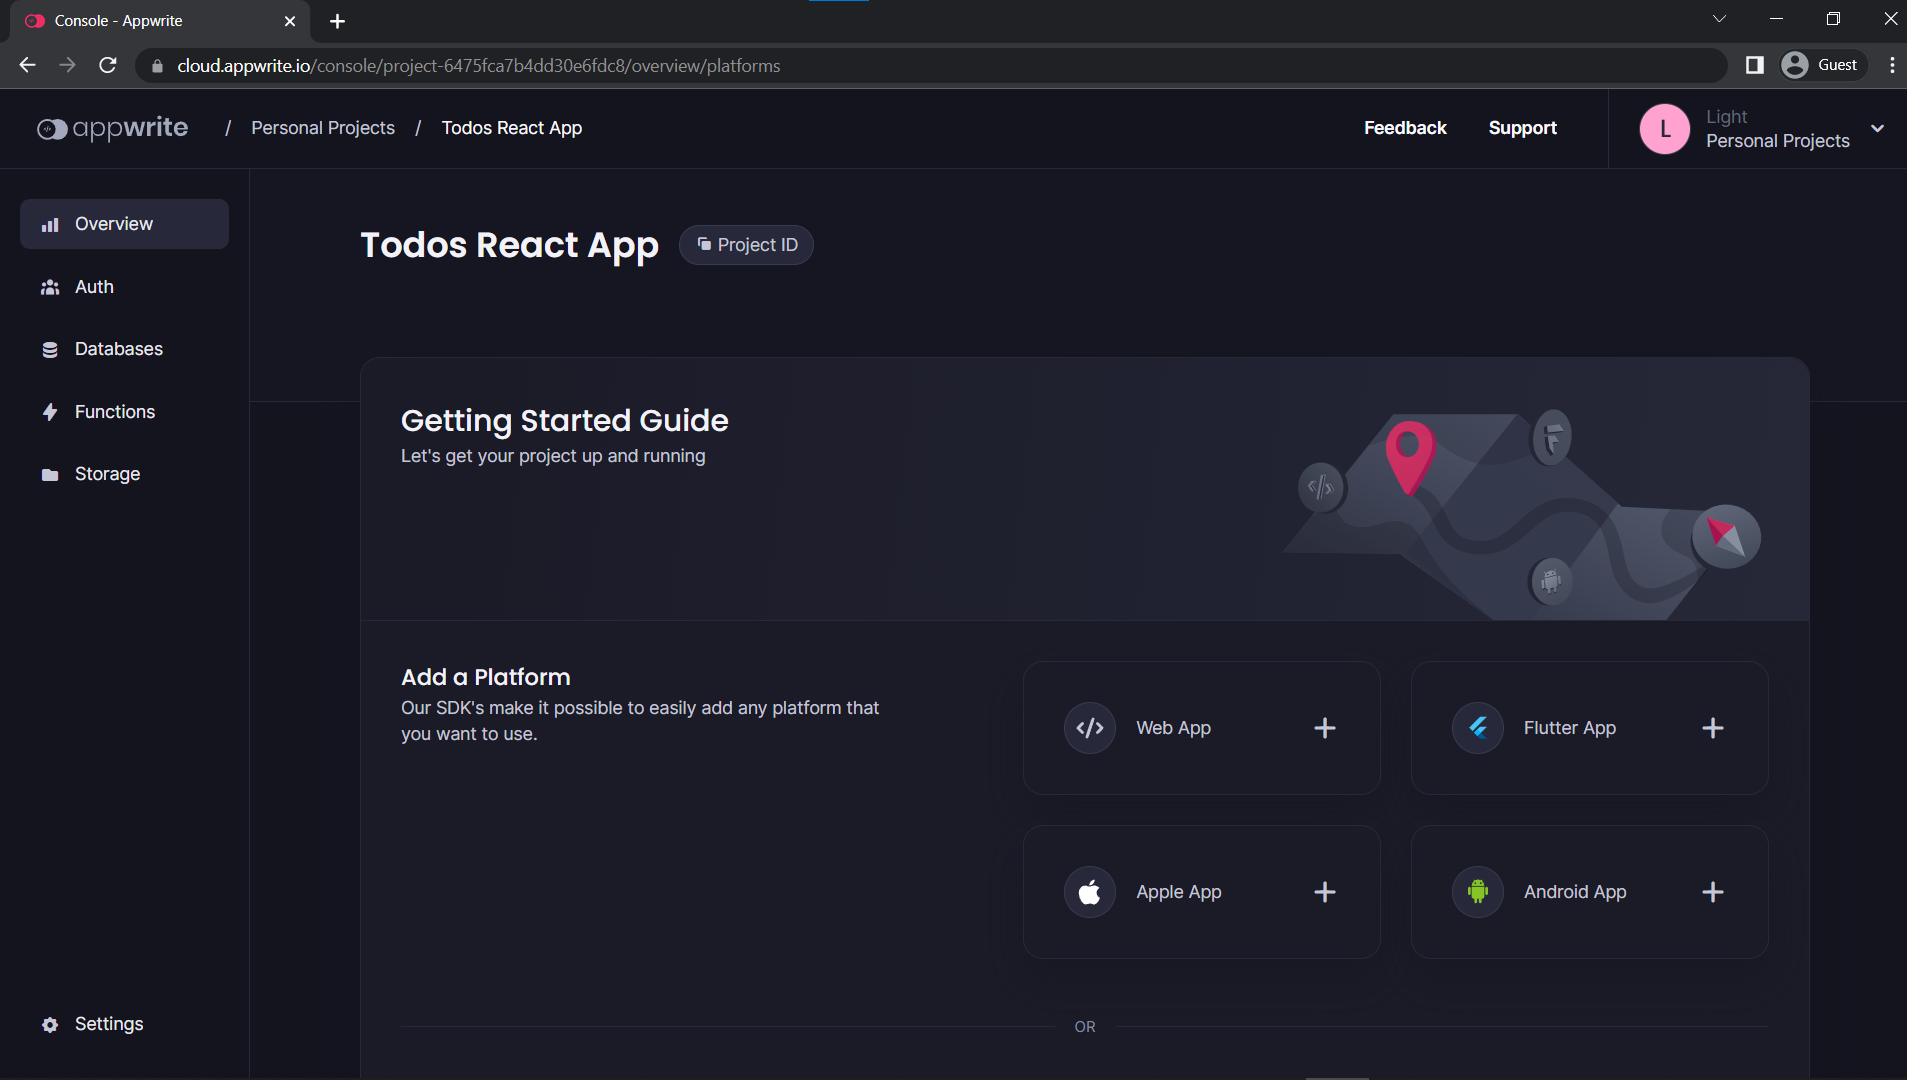
- Fill in the name for your web app and click on the next for the following steps.

- After creating your web app, you should see a similar screen,
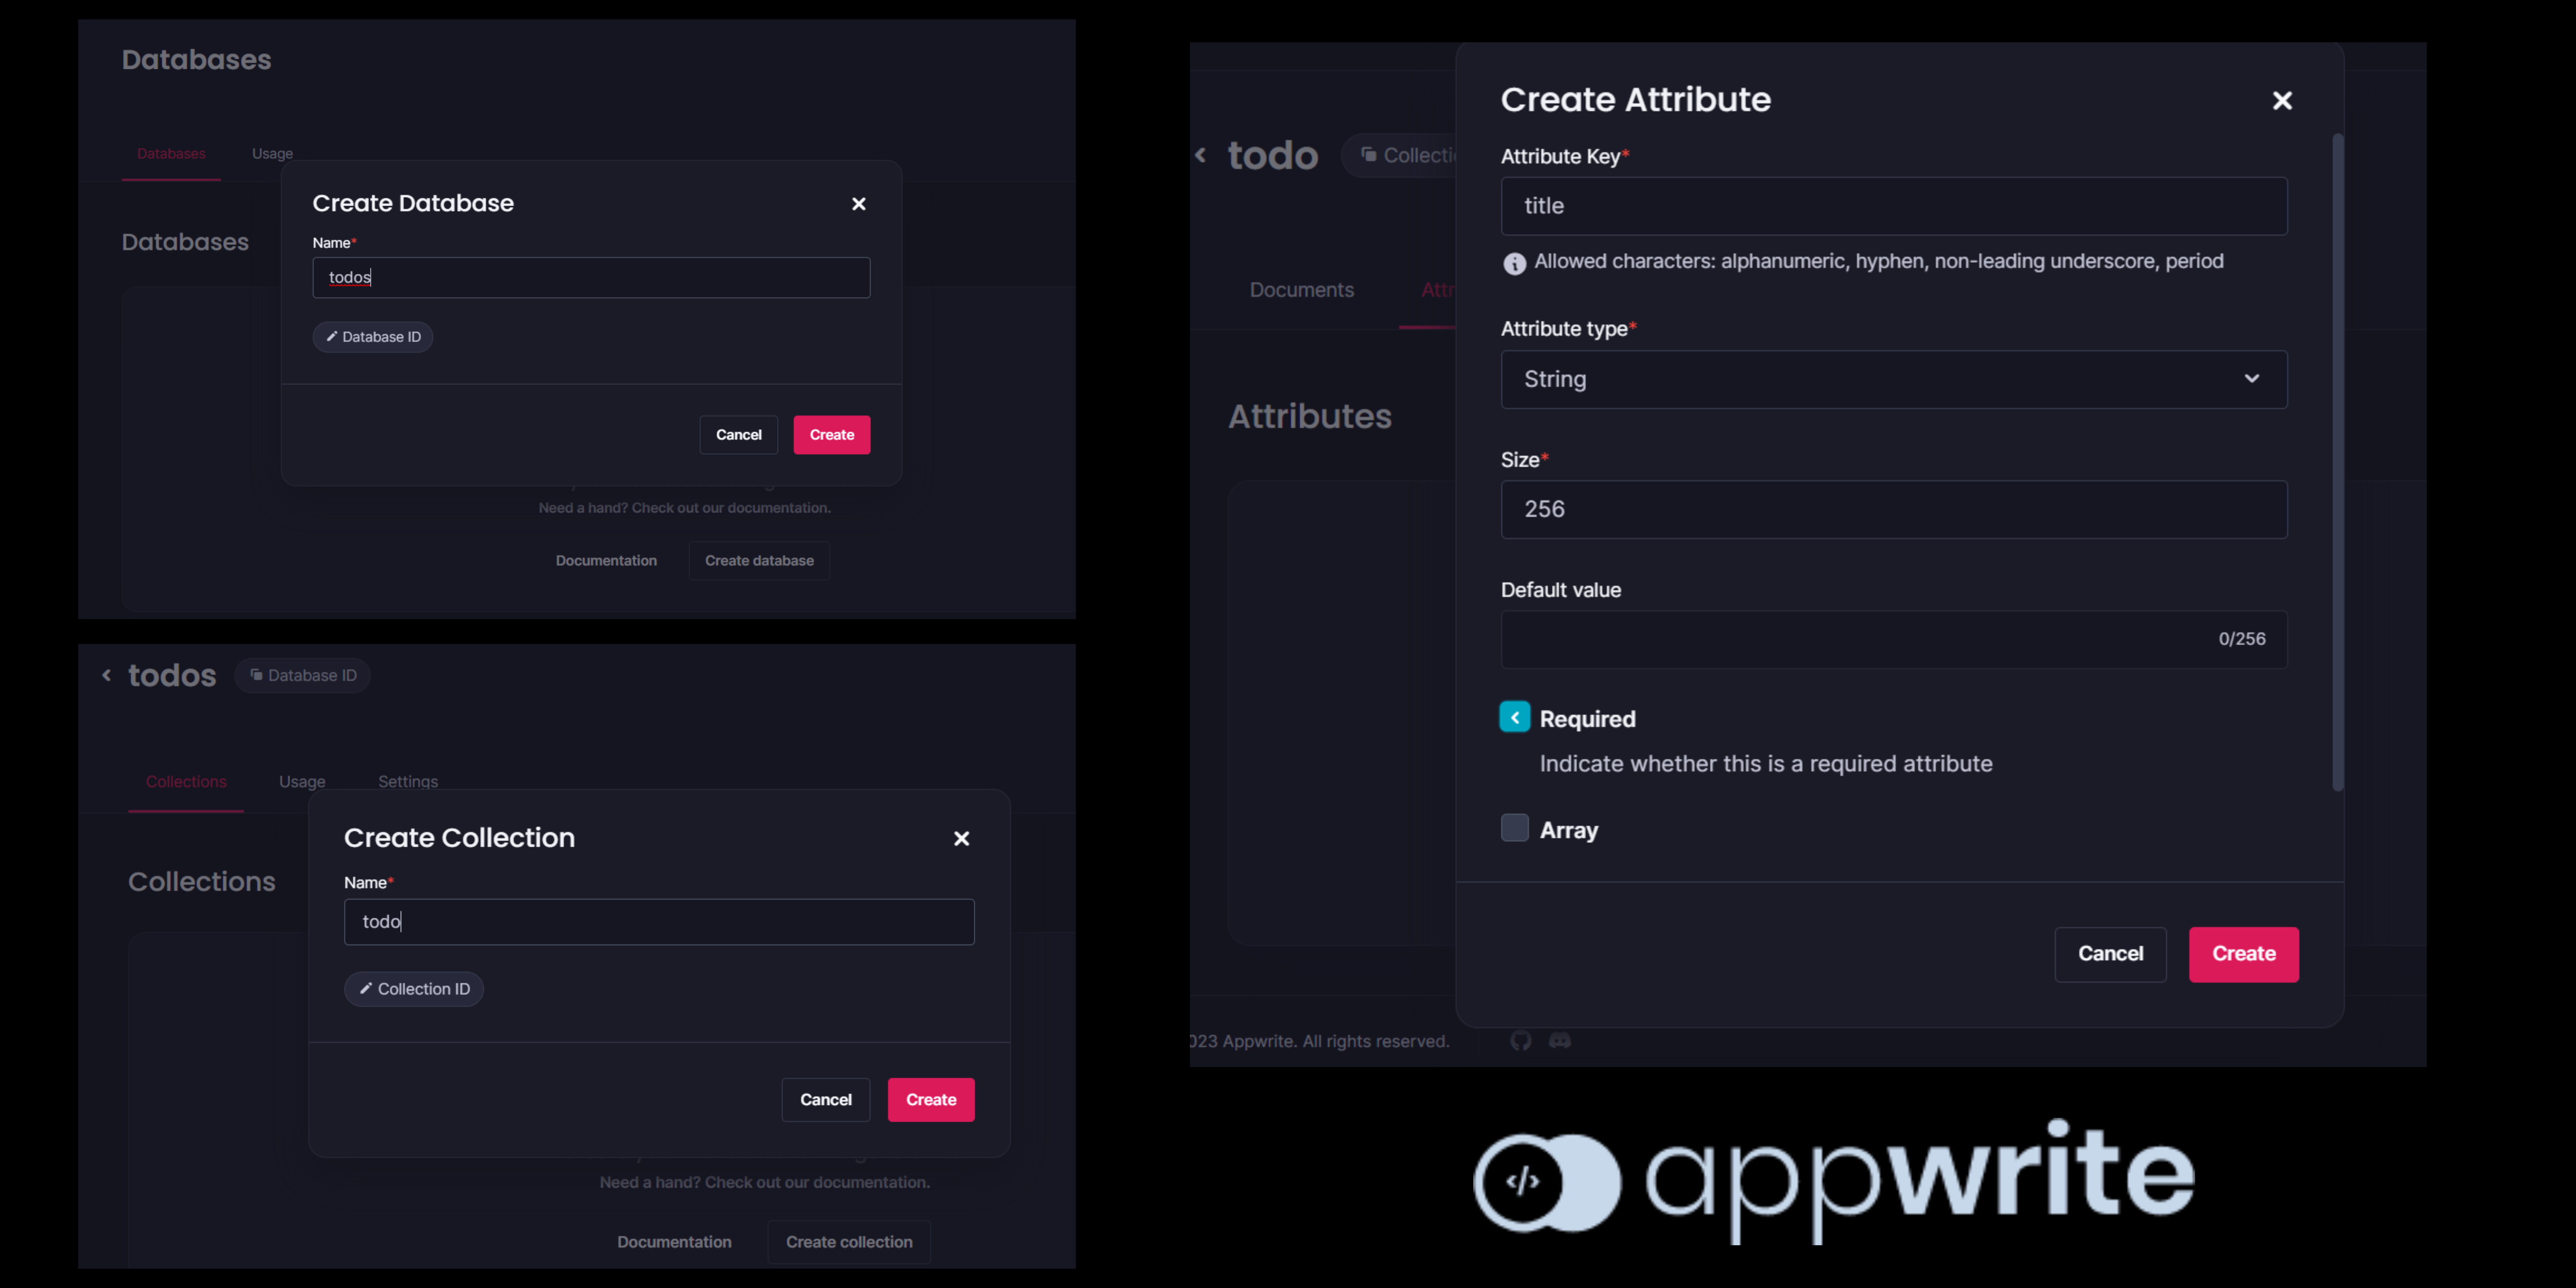
Now, we'll create a database for storing our ToDos. So, go to the Databases tab from the left nav, and click on Create Database button on the right side of the screen.
Enter the Database name as
todosand click on CreateNext, create a collection and give it a name
todoNOTE: Collections are just like the template for objects that you want to store in the database.
For example, in our case, we want to store a todo in our database, which will probably have attributes like the title (string), description (string), whether it is completed(boolean), and so on as needed.
Go to the attribute tab of the collection and add the required attributes by pressing the
Create Attributebutton.
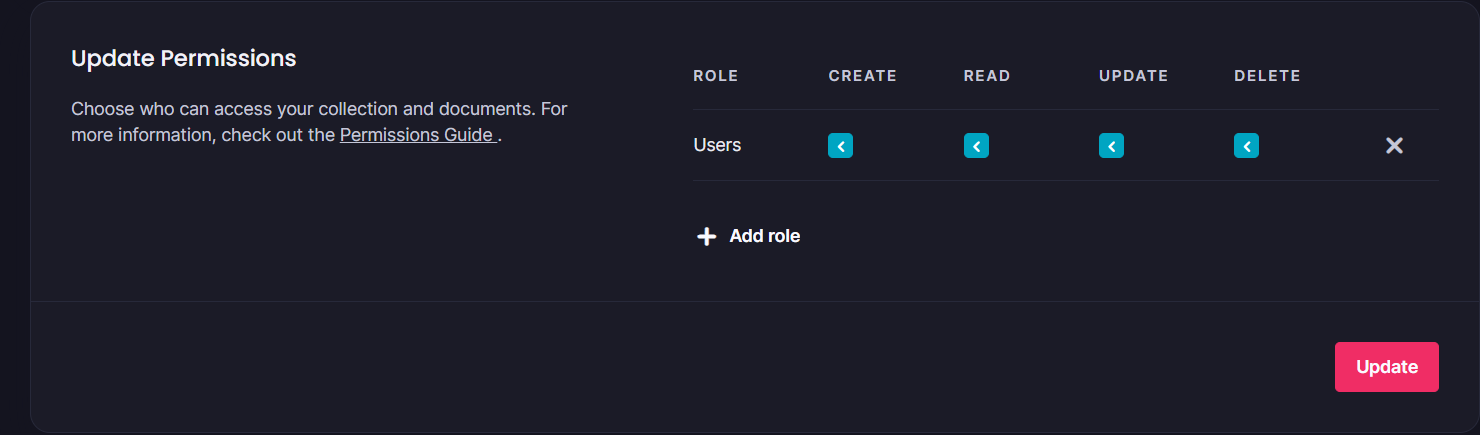
Now go to the
Settingstab in the collection and go to the Update Permissions section. Click toAdd roleand giveAll Usersaccess to read/write/update/delete the collection and click on update.This will give all the users and not just the one who created the todo, the access to read/write/update/delete the documents. This is not something you would do in your real application, but for learning purposes we will keep it simple.
Since we have created the database, we are all set on this side, next, let's integrate our database with our ReactJs project.
Initializing Appwrite Client & Account
Client: is the user object that has access to the appwrite project
Account: it is a collection of user data that is stored in appwrite
To use Appwrite web SDK you have to first initialize a client object and set it up with the endpoint and your project id. You can find both of these in the project settings.
We'll also initialize the account object with the client access which we will later use to register new users, and also connect to our databases using the client. We'll put all this in the appwriteConfig.js file that we created in src/appwrite.
The entire code is uploaded on GitHub, right here.
src/appwrite/appwriteConfig.js
import { Client, Account, Databases } from 'appwrite';

export const DATABASES_ID = "" // your database id
export const PROJECT_ID = "" // your project id
export const COLLECTION_ID = "" // your collection id

const client = new Client();
client
    .setEndpoint('https://cloud.appwrite.io/v1')
    .setProject(PROJECT_ID);

export const account = new Account(client); // initialize account

// database
export const databases = new Databases(client);
With this, we are ready to use any functionality of appwrite in our project. Before that, let's create a basic UI for our site.
Create Routing
We'll have the login page on our '/' route, a signup page on '/signup' route and a main profile page where all the todos will be shown on the '/profile' route.
Let's set up all our routes in the
App.jsfile.src/App.js
import logo from './logo.svg';
import {
  BrowserRouter as Router,
  Routes,
  Route
} from 'react-router-dom';
import './App.css';
import Login from './components/Login';
import Signup from './components/Signup';
import Profile from './components/Profile';
import './index.css'

function App() {
  return (
    <Router>
      <Routes>
        <Route path="/" element={<Login />} />
        <Route path="/signup" element={<Signup />} />
        <Route path="/profile" element={<Profile />} />
      </Routes>
    </Router>
  );
}
export default App;
Sign Up Page
We can sign up or register a new user with appwrite by creating a new account using the
createmethod of the account class.Account.create(uniqueId, email, password, name)Use this endpoint to allow a new user to register a new account in your project.
This is an async function and we'll use
.then()to handle the response and error. After a successful signup, we can either navigate the user to the login page or to the profile page directly, I have chosen to do the latter.
        // signup
        const promise = account.create(
            uuidv4(),
            user.email,
            user.password,
            user.name)
// user is a state variable which has all values of email, name and password from the signup form
        promise.then(
            function(response) {
                // console.log(response);
                naviate('/profile')
            },
            function(error){
                console.log(error);
            }
        )
Now, let's create the UI for the signup page
The entire code is uploaded on GitHub, right here.
src/components/Signup.jsx
import React, { useState } from 'react'
import { useNavigate } from 'react-router-dom';
import { account } from '../appwrite/appwriteConfig'
import { v4 as uuidv4 } from 'uuid';

const Signup = () => {

   const naviate = useNavigate();
    const [user, setuser] = useState({
        name: "",
        email: "",
        password: ""
    })

    const signupUser = async(e) => {
        e.preventDefault()

        // signup
        const promise = account.create(
            uuidv4(),
            user.email,
            user.password,
            user.name
        )

        promise.then(
            function(response) {
                // console.log(response);
                naviate('/profile')
            },
            function(error){
                console.log(error);
            }
        )
    }
  return (
    <div className='flex items-center justify-center h-[100vh] w-[100%] bg-bg-dark text-white'>
          <form className="flex flex-col m-auto md:w-1/4 h-1/2 p-5 justify-evenly border-2 border-black rounded-xl bg-list-dark shadow-dark-shadow bg-dark-gradient" onSubmit={signupUser}>
              <h1 className='text-center text-3xl font-bold' >Create an account</h1>
              <input className="block border-b-2 p-3 rounded-lg active:outline-none active:border-x-none active:border-t-none text-black" type="text" id='name' placeholder="Name" onChange={(e) => setuser({...user, name: e.target.value})} />
              <input className="block border-b-2 p-3 rounded-lg active:outline-none active:border-x-none active:border-t-none text-black" type="email" placeholder="Email" onChange={(e) => setuser({...user, email: e.target.value})} />
              <input className="block border-b-2 p-3 rounded-lg active:outline-none active:border-x-none active:border-t-none text-black" type="password" placeholder="Password" onChange={(e) => setuser({...user, password: e.target.value})} />
            <button className='font-bold text-lg w-1/3 rounded-full mx-auto py-3 bg-black' type="submit">Sign Up</button>
              <span className="text-sm">
                  Already have an account? <a href="/" className="text-blue hover:text-blue font-semibold underline">Log In</a>
              </span>
        </form>
    </div>
  )
}

export default Signup
Login Page
For login functionality we use
Account.createEmailSession(email, password):Allow the user to login into their account by providing a valid email and password combination. This route will create a new session for the user.(source:appwrite docs)After logging in successfully we navigate to the user '/profile' page.
 const promise = account.createEmailSession(user.email , user.password);

         promise.then(function (response) {
             // console.log(response); // Success
             navigate('/profile')
         }, function (error) {
             console.log(error); // Failure
         });
Let's setup the UI for the login page
src/components/Login.jsx```javascript import React, { useState } from 'react' import { useNavigate } from 'react-router-dom' import { account } from '../appwrite/appwriteConfig'
const Login = () => {
return (
Log In
setuser({ ...user, email: e.target.value })} /> setuser({ ...user, password: e.target.value })} />
Log In
Don't have an account? Sign up ) }
export default Login
    *The entire code is uploaded on GitHub,* [*right here*](https://github.com/yagyesh-bobde/ToDo-React-App-With-Appwrite)*.*

2. ### Profile Page

    This is the page where all todos will be shown, so we will have to fetch all documents from our database first. We can do this by using the following method:

    `Databases.listDocuments(databaseId: string, collectionId: string, queries?: string[])`

    *Get a list of all the user's documents in a given collection. You can use the*

    *query parameters to filter your results.*


```javascript
    let promise = databases.listDocuments(DATABASES_ID, COLLECTION_ID)
    promise.then(function (response) {
            setTodos(response.documents)
            console.log(response); // Success
        }, function (error) {
            console.log(error); // Failure
    });
Let's also take a look at how we can update and delete documents because we will be implementing those functionalities as well.
For updating a document we use the updateDocument() method
databases.updateDocument(databaseId: string, collectionId: string, documentId: string, data?)
Update a document by its unique ID. Using the patch method you can pass only specific fields that will get updated. (source: appwrite docs)
        const promise = databases.updateDocument(DATABASES_ID, COLLECTION_ID, todo.$id, {
            completed: !todo.completed //toggle only the completed attributed
        })

        promise.then(function (response) {
            console.log(response); // Success
            fetchTodos()
        }
            , function (error) {
                console.log(error); // Failure
        });
For deleting document entries we will use deleteDocument() method
databases.deleteDocument(databaseId: string, collectionId: string, documentId: string)
Delete a document by its unique ID.
    const promise = databases.deleteDocument(DATABASES_ID, COLLECTION_ID, DOCUMENT_ID)

    promise.then(function (response) {
      console.log(response); // Success
      fetchTodos()
    }, function (error) {
      console.log(error); // Failure
    });
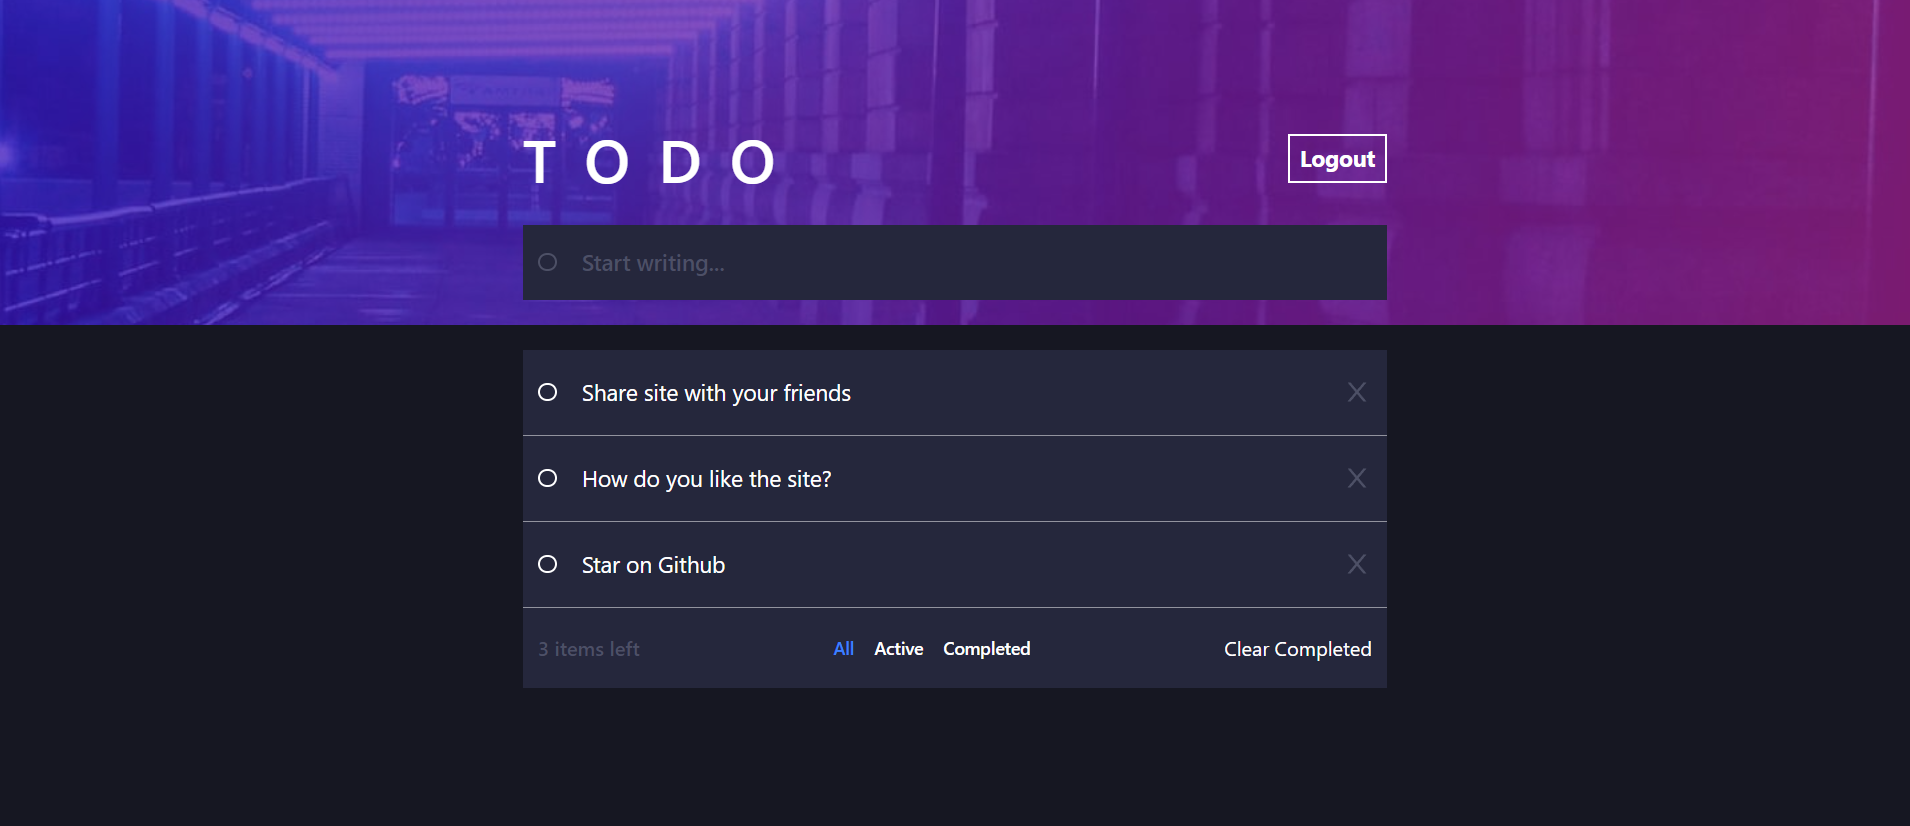
Now let's create the UI for the profile page
The entire code is uploaded on GitHub, right here.
src/components/Profile.jsx
import React, { useEffect, useState } from 'react'
import { Link, useNavigate } from 'react-router-dom'
import { COLLECTION_ID, DATABASES_ID, account, databases } from '../appwrite/appwriteConfig'
import TodoForm from './TodoForm'
import Todos from './Todos'
import styles from './Profile.module.css'
import Sun from '../images/icon-sun.svg'
import Moon from '../images/icon-moon.svg'
import { GrClose } from 'react-icons/gr'
import { Query } from 'appwrite'

const Profile = () => {
    const navigate= useNavigate()
    const [todos, setTodos] = useState([])
    const [userDetails, setuserDetails] = useState()
    const [showForm, setshowForm] = useState(false)

    const [activeClass, setactiveClass] = useState({
        all: true,
        active: false,
        completed: false
    })


    const toggleCompleted = (todo) => {
        const promise = databases.updateDocument(DATABASES_ID, COLLECTION_ID, todo.$id, {
            completed: !todo.completed
        })

        promise.then(function (response) {
            console.log(response); // Success
            fetchTodos()
        }
            , function (error) {
                console.log(error); // Failure
        });
    }

    const deleteTodo = (todo) => {
        const promise = databases.deleteDocument(DATABASES_ID, COLLECTION_ID, todo.$id)

        promise.then(function (response) {
            console.log(response); // Success
            fetchTodos()
        }, function (error) {
            console.log(error); // Failure
        });
    }

    const changeActiveClass = (type) => {
        setactiveClass({
            all: false,
            active: false,
            completed: false,
            [type]: true
        });
        fetchTodos(type)
    }


    const clearCompleted = () => {
        todos.filter(todo => todo.completed).map(todo => deleteTodo(todo))

    }


    useEffect(() => {
      const getData = account.get().then((res) => {
        console.log(res)
        setuserDetails(res)
      },(error) => {
        console.log(error)
        navigate('/')
      })
    }, [])

    const handleLogout = () => {
        account.deleteSession('current').then((res) => {
            console.log(res)

        },(error) => {
            console.log(error)
        })
        navigate('/')
    }

    const fetchTodos = async (type = 'all') => {
        let promise;
        if (type === 'all') {
            promise = databases.listDocuments(DATABASES_ID, COLLECTION_ID)
        } else if (type === 'active') {
            promise = databases.listDocuments(DATABASES_ID, COLLECTION_ID, [
                Query.equal('completed', false )
            ])
        } else {
            promise = databases.listDocuments(DATABASES_ID, COLLECTION_ID, [
                Query.equal('completed', [true])
            ])
        }

        promise.then(function (response) {
            setTodos(response.documents)
            console.log(response); // Success
        }, function (error) {
            console.log(error); // Failure
        });
    }

    useEffect(() => {
        fetchTodos()
    }, [])

  return (
    <div className="min-h-[100vh] bg-bg-dark ">
          {/* FORM MODAL */}
          {showForm &&
              <TodoForm fetchTodos={fetchTodos} setshowForm={setshowForm} />}


          <div className="topDiv bg-bg-desktop-dark w-full min-h-[35vh] bg-no-repeat bg-cover flex justify-between items-center">
              <nav className="topDiv_nav flex justify-between items-center w-[45%] m-auto">
                  <header className=" text-5xl tracking-widest font-semibold"
                  style={{ color: '#fff' }}
                  >
                    T O D O
                </header>
                <div className="right flex items-center gap-5 w-1/7">
                    {/* <div className="toggle flex items-center justify-center hover:cursor-pointer">
                        <img src={Sun} alt="toggle site theme between night/light" />
                    </div> */}

                    <button className="first-letter bg-transparent font-bold border-2 text-lg p-1 px-2 text-white duration-200 hover:scale-105" onClick={handleLogout}>Logout</button>
                </div>
            </nav>
        </div>
        {userDetails ?
              <div className="todo_container w-3/4 m-auto flex flex-col items-center justify-center -mt-10">
                <div className="w-3/5 -mt-10 mb-10 flex items-center justify-between py-4 px-3 bg-list-dark duration-300 hover:scale-[1.02]"
                onClick={() => setshowForm(true)}
                >
                      <div className="leftListItem flex items-center gap-5">
                          <div className={`border-2 border-list-font-dark rounded-full p-1 flex items-center justify-center min-w-[15px] min-h-[15px] hover:cursor-pointer`}

                          ></div>
                          <p className={`text-lg text-list-font-dark font-semibold`} >
                              Start writing...
                          </p>
                      </div>
                </div>
                  <Todos
                  fetchTodos={fetchTodos}
                  todos={todos}
                  />
                 { (todos.length) && <footer
                      className='flex w-3/5 items-center justify-between py-5 px-3 bg-list-dark text-white'
                  >
                      <div className="leftSifeFooter text-list-font-dark font-semibold">
                          {todos.length} items left
                      </div>
                      <ul className="centerSideFooter flex items-center gap-4 font-semibold text-sm">
                          <li className={`hover:cursor-pointer ${activeClass.all && 'text-color-blue'}`}
                              onClick={() => changeActiveClass('all')}
                          >
                              All
                          </li>
                          <li className={`hover:cursor-pointer ${activeClass.active && 'text-color-blue'}`}
                              onClick={() => changeActiveClass('active')}
                          >
                              Active
                          </li>
                          <li className={`hover:cursor-pointer ${activeClass.completed && 'text-color-blue'}`}
                              onClick={() => changeActiveClass('completed')}
                          >
                              Completed
                          </li>
                      </ul>
                      <div className="rightSideFooter hover:cursor-pointer" onClick={clearCompleted} >
                          Clear Completed
                      </div>
                  </footer>}
            </div>
            :
            <>
                <p className="mt-4">
                    Please Login To see Profile{" "}
                    <Link to="/" className="text-blue-500 hover:underline">
                        <span className="bg-blue-300 p-2 cursor-pointer text-white">
                            Login
                        </span>
                    </Link>
                </p>
            </>
        }
    </div>
  )
}

export default Profile
We also need the Todos component, to render the list of todos on the profile,
src/components/Todos.jsx
import React, { useEffect, useState } from 'react'
import { COLLECTION_ID, DATABASES_ID, databases } from '../appwrite/appwriteConfig'
import Check from '../images/icon-check.svg'

import { AiOutlineClose } from 'react-icons/ai'
import styles from './todos.module.css'
import { Query } from 'appwrite'


const Todos = ({ fetchTodos, todos } ) => {


  const [activeClass, setactiveClass] = useState({
    all: true,
    active: false,
    completed: false
  })


  const toggleCompleted = (todo) => {
    const promise = databases.updateDocument(DATABASES_ID, COLLECTION_ID, todo.$id , {
      completed: !todo.completed
    })

    promise.then(function (response) {
      console.log(response); // Success
      fetchTodos()
    }
    , function (error) {
      console.log(error); // Failure
    });
  }

  const deleteTodo = (todo) => {
    const promise = databases.deleteDocument(DATABASES_ID, COLLECTION_ID, todo.$id)

    promise.then(function (response) {
      console.log(response); // Success
      fetchTodos()
    }, function (error) {
      console.log(error); // Failure
    });
  }

  const changeActiveClass = (type) => {
    setactiveClass({
      all: false,
      active: false,
      completed: false,
      [type]: true});
  }


  const clearCompleted = () => {

    todos.filter(todo => todo.completed).map(todo => deleteTodo(todo))

  }

  return (
    <ul
    className={`text-white bg-list-dark w-3/5 max-h-[45vh] overflow-y-auto overflow-x-hidden duration-200 ${styles.scrollingCustom}`}>
      {todos.map((todo, num) => {
        return (
          <li className={`border-b-[0.5px] border-[rgb(255,255,255,0.5)] w-full flex items-center justify-between py-5 px-3 bg-list-dark duration-300 hover:scale-[1.02] `} key={todo.$id}>

            <div className="leftListItem flex items-center gap-5">
              <div className={`border-2 rounded-full p-1 flex items-center justify-center ${todo.completed ? 'bg-check-gradient' : ''} min-w-[15px] min-h-[15px] hover:cursor-pointer`}
                onClick={() => toggleCompleted(todo)}
              >
                {
                  todo.completed && <img src={Check} alt="" />
                }

              </div>
              <p className={`text-lg ${todo.completed ? 'line-through text-list-font-dark font-semibold' : ""}`} >
                {todo.title}
              </p>
            </div>
            <div className="rightListItem items hover:cursor-pointer"
              onClick={() => {
                deleteTodo(todo)
              }}
            >
              <AiOutlineClose className="text-list-font-dark text-2xl" />
            </div>
          </li>
        )
      })}

    </ul>
  )
}

export default Todos
This completes our project UI and integration with the backend.

Challenges Faced
Although the appwrite docs were very helpful, navigating the Appwrite docs was not easy
I faced some issues while querying the documents
Public Code Repo
The entire code is uploaded on GitHub, you can check it out right here.
Demo Link
You visit my demo site right here: https://to-do-react-app-with-appwrite.vercel.app
Things To Improve
Add filter functionality in the project
Create separate users collections to have todos unique to the user
Add dark light mode
The UI design for this project was inspired by a challenge on frontendmentor.io
What's next?
In the next blog, we'll create a chat application with Appwrite.


